How to install a computer network card

Most computers today have an onboard NIC (network interface card), which is integrated into the motherboard, eliminating the need to install one. If your computer does not have an onboard network card or you'd like a different one, there are aftermarket options. Furthermore, if the onboard network card is not working, you cannot remove it, but you can install a new one instead. Review each section below to learn how to install a network card in your computer.
Buying tips and help
For help with what network card to buy for your computer, see our buying tips page linked below.
How to determine the network card type
Before getting started
- The difficulty of installing a PC network card is a 3 out of 5.
- Write down important information from the top or bottom of the card, such as the Model Number, Serial Number, and specifications.
- Ensure you are familiar with ESD (electrostatic discharge) and its potential dangers.
- When physically installing the network card, ensure the computer is powered down and unplugged.
Set jumpers
If you have an older computer and network card, it may utilize jumpers to function. Verify the jumpers are properly set before installing the network card.
Today's computers do not have jumpers for network card installation, allowing the network card to be set up and configured through software or plug and play.
Install in the available expansion slot
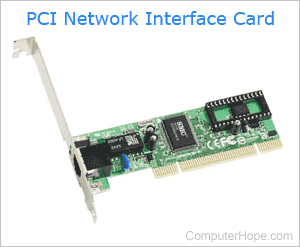
Network cards connect to a PCI (peripheral component interconnect) slot on the computer motherboard. Locate an available PCI expansion slot in the computer and gently push the card into the slot until it snaps in place. After inserting the card, place a screw at the end of the card's metal bracket to secure it to the computer case.
If your computer has a network card already installed and you are replacing or upgrading that network card, you must remove the existing network card before installing the new card. For further help, see: How to remove a computer expansion card.
Attach internal cables
Most network cards do not require and include internal cables, but you may find a Wake-on-LAN cable, which wakes the computer when network activity is present. If cables are included with the network card, and your computer supports these cables, install those cables now.
The Wake-on-LAN cable must also be a supported feature of the computer motherboard. The cable connects to the Wake-on-LAN or a similar connection on the motherboard. Consult the motherboard documentation or manufacturer for additional information if this is a supported feature or where the cable should be connected.
Attach external cables
Once the network card is physically installed, replace the computer case side or top panel and connect the keyboard, mouse, monitor, power cable, and network cable. Then, connect the other end of the network cable to the network port on a hub, switch, or router.
Software setup
Once connected, turn the computer on and install the drivers for the network card and operating system, Windows or macOS, on your computer. If you do not have drivers for your network card or the network card drivers included appear not to work, you can find links to network drivers on our network card drivers page.
Once the network card is installed, set the configuration values for the network card in the software. These values usually depend on the configuration of your network. For a home network, consult your router's printed or online manual. If you connect to a corporate or business network and aren't sure how to configure the network card, contact your network administrator for help.
